C++ 컴파일 오류 해결 가이드 | 초보자가 자주 겪는 10가지 에러
이 글의 핵심
에러 메시지가 무슨 뜻인지 모르면 같은 실수를 반복하게 됩니다. 각 오류마다 실제 메시지 예시와 흔히 생기는 상황을 먼저 보여 주고 고친 코드를 제시하므로, 템플릿 함수 정의 위치나 헤더 중복 포함, 삭제된 함수 호출처럼 원인이 메시지에 바로 드러나지 않는 경우도 스스로 추적할 수 있게 됩니다.
들어가며: “에러 메시지가 무슨 뜻인지 모르겠어요”
C++을 처음 배울 때 가장 답답한 순간은 길고 복잡한 컴파일 오류 메시지를 마주할 때입니다. 메시지가 가리키는 줄과 실제로 고칠 줄이 다른 경우도 많아서, 메시지의 구조를 모르면 엉뚱한 곳을 고치게 됩니다.
이 글은 초보자가 자주 만나는 오류 아홉 가지와 실행 중에 터지는 segmentation fault를 하나씩 다룹니다. 각 항목마다 메시지 예시, 흔한 원인, 고친 코드를 보이고, 메시지만 봐서는 원인이 드러나지 않는 경우를 덧붙였습니다. 예시 메시지는 GCC 기준이며, Clang은 문구가 조금 다를 수 있습니다.
undefined reference to ‘function’
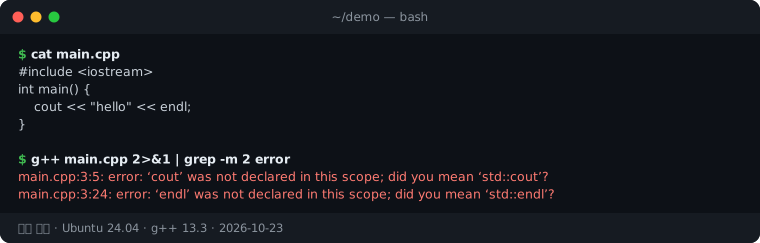
그림: 실제 실행 결과 — GCC는 비슷한 이름을 찾아 did you mean으로 알려 준다. std::를 붙이거나 필요한 이름만 using으로 가져온다. (환경: Ubuntu 24.04 · g++ 13.3)
원인
함수 선언은 있지만 정의(구현)가 없거나, 링커가 구현을 찾지 못할 때 발생합니다.
에러 메시지
undefined reference to `myFunction()'실제 출력
header.h에 void myFunction();만 선언하고 main.cpp가 호출하는 코드를 Ubuntu 24.04 aarch64 컨테이너의 g++ 13.3(-std=c++20)과 clang++ 18.1.3로 main.cpp만 컴파일·링크해 보면 이렇게 나옵니다.
# g++
/usr/bin/ld: /tmp/ccTe9WNN.o: in function `main':
main.cpp:(.text+0x8): undefined reference to `myFunction()'
collect2: error: ld returned 1 exit status

# clang++
/usr/bin/ld: /tmp/main-489613.o: in function `main':
main.cpp:(.text+0x8): undefined reference to `myFunction()'
clang++: error: linker command failed with exit code 1 (use -v to see invocation)
두 컴파일러 모두 실제 오류를 내는 것은 /usr/bin/ld이고, 마지막 줄만 collect2: error: ld returned 1 exit status(GCC)와 linker command failed with exit code 1(Clang)로 다릅니다. 줄 번호 대신 .text+0x8 같은 오프셋이 나오는 것도 링크 단계 오류의 특징입니다.
흔한 상황
- 헤더에 선언만 하고 .cpp에 구현하지 않음
- 링크할 때 해당 .cpp나 .o 파일을 포함하지 않음
- 템플릿 함수를 .cpp에 정의함(아래에서 설명)
해결 방법
// ❌ 잘못된 예: 선언만 있고 정의 없음
// header.h
void myFunction();
// main.cpp
#include "header.h"
int main() {
    myFunction();  // undefined reference!
}
// ✅ 올바른 예: 정의 추가
// header.h
void myFunction();
// impl.cpp
#include "header.h"
void myFunction() {
    // 구현
}
// 컴파일 시 모든 .cpp 파일 포함
// g++ main.cpp impl.cpp -o program
undefined reference는 컴파일 에러가 아니라 링크 에러라는 점부터 구분해야 합니다. 에러 메시지 앞에 main.cpp:10:5: 같은 줄 번호가 아니라 /usr/bin/ld:나 collect2: error: ld returned 1 exit status가 붙어 있다면, 각 .cpp 파일은 문제없이 컴파일되었고 마지막에 조각들을 합치는 단계에서 정의를 찾지 못한 것입니다. 그래서 코드를 아무리 봐도 문법 문제가 없어 보이는 것이 정상입니다. 위의 두 경우 외에 자주 보는 원인은 다음과 같습니다.
- static 멤버 변수 정의 누락: 클래스 안에
static int count;만 선언하고.cpp에int MyClass::count = 0;을 두지 않으면undefined reference to 'MyClass::count'가 납니다. C++17부터는 클래스 안에서static inline int count = 0;으로 해결할 수 있습니다. - 가상 함수 정의 누락: 순수 가상이 아닌 가상 함수의 정의를 빠뜨리면
undefined reference to 'vtable for MyClass'라는 알쏭달쏭한 메시지가 나옵니다. GCC와 Clang은 클래스에서 처음 선언된 비인라인·비순수 가상 함수(key function)가 정의된 파일에 vtable을 만들기 때문에, 그 함수의 정의가 없으면 vtable 자체가 생성되지 않습니다. 보통 가상 소멸자를 선언만 하고 정의하지 않은 경우입니다. - 라이브러리 링크 누락이나 순서 문제:
-lpthread,-lm같은 라이브러리를 빠뜨렸거나, GCC에서g++ -lfoo main.cpp처럼 라이브러리를 사용하는 파일보다 앞에 적으면 정의를 찾지 못합니다. 라이브러리는 명령줄 뒤쪽에 둡니다. - C 라이브러리 함수: C로 컴파일된 함수를 C++에서 부를 때 헤더에
extern "C"가 없으면, C++ 컴파일러가 이름을 다르게 꾸며(name mangling) 링커가 찾지 못합니다.
템플릿 함수의 경우
// ❌ 잘못된 예: 템플릿을 .cpp에 정의
// header.h
template<typename T>
void process(T value);
// impl.cpp
template<typename T>
void process(T value) {
    // 구현
}
// ✅ 올바른 예: 템플릿을 헤더에 정의
// header.h
template<typename T>
void process(T value) {
    // 구현 (헤더에 작성)
}
템플릿은 함수 자체가 아니라 “함수를 만드는 틀”이라서, process<int>가 필요하다는 사실을 아는 곳(main.cpp)에서 정의를 볼 수 있어야 실제 함수가 만들어집니다. impl.cpp에 정의만 두면 그 파일은 어떤 타입으로 쓰일지 모르니 아무 함수도 만들지 않고, main.cpp는 정의를 모르니 호출만 남겨 링크 단계에서 실패합니다. 쓰이는 타입이 정해져 있다면 impl.cpp 끝에 template void process<int>(int);처럼 명시적 인스턴스화를 적어 헤더에 구현을 노출하지 않는 방법도 있습니다.
segmentation fault (core dumped)
원인
segmentation fault는 컴파일 오류가 아니라 실행 중에 운영체제가 잘못된 메모리 접근을 감지해 프로그램을 종료시키는 것입니다. 주로 nullptr 역참조, 배열 범위 초과, 해제한 메모리 사용이 원인입니다.
에러 메시지
Segmentation fault (core dumped)실제 출력
int* p = nullptr; *p = 42;를 실행한 결과입니다. Ubuntu 24.04 aarch64 컨테이너의 g++ 13.3(-std=c++20)과 clang++ 18.1.3 환경에서 셸이 알려 주는 메시지는 코어 덤프 설정에 따라 달라졌습니다.
# ulimit -c 0 (기본값): 코어 파일을 만들지 않음
Segmentation fault
exit=139

# ulimit -c unlimited
Segmentation fault (core dumped)
exit=139
(core dumped)는 오류의 종류가 아니라 코어 파일이 실제로 만들어졌다는 뜻입니다. 종료 코드 139는 128 + 11(SIGSEGV)입니다. -g -fsanitize=address로 다시 빌드하면 같은 코드에서 어디서 죽었는지가 바로 나옵니다.
==4246==ERROR: AddressSanitizer: SEGV on unknown address 0x000000000000 (pc 0xaaaabdee0d00 ...)
==4246==The signal is caused by a WRITE memory access.
==4246==Hint: address points to the zero page.
    #0 0xaaaabdee0d00 in main /w/seg/main.cpp:4
널 포인터에 쓰기(WRITE)였고 main.cpp:4가 위치라는 것까지 알려 줍니다.
흔한 상황
- nullptr 역참조
- 배열 범위 초과
- delete 후 사용(dangling pointer)
- 스택 오버플로(무한 재귀)
해결 방법
// ❌ nullptr 역참조
int* ptr = nullptr;
*ptr = 10;  // segmentation fault!
// ✅ nullptr 체크
int* ptr = nullptr;
if (ptr != nullptr) {
    *ptr = 10;
}
// ❌ 배열 범위 초과
int arr[5];
arr[10] = 100;  // 미정의 동작: 크래시할 수도, 조용히 다른 값을 덮어쓸 수도 있음
// ✅ 범위 체크 또는 vector 사용
std::vector<int> vec(5);
vec.at(10) = 100;  // std::out_of_range 예외 발생
// ❌ delete 후 사용
int* ptr = new int(10);
delete ptr;
*ptr = 20;  // 미정의 동작(use-after-free)
// ✅ delete 후 nullptr 할당
int* ptr = new int(10);
delete ptr;
ptr = nullptr;
if (ptr != nullptr) {
    *ptr = 20;
}
디버깅 팁
# gdb로 디버깅
g++ -g program.cpp -o program
gdb ./program
(gdb) run
# 크래시 지점 확인
(gdb) backtrace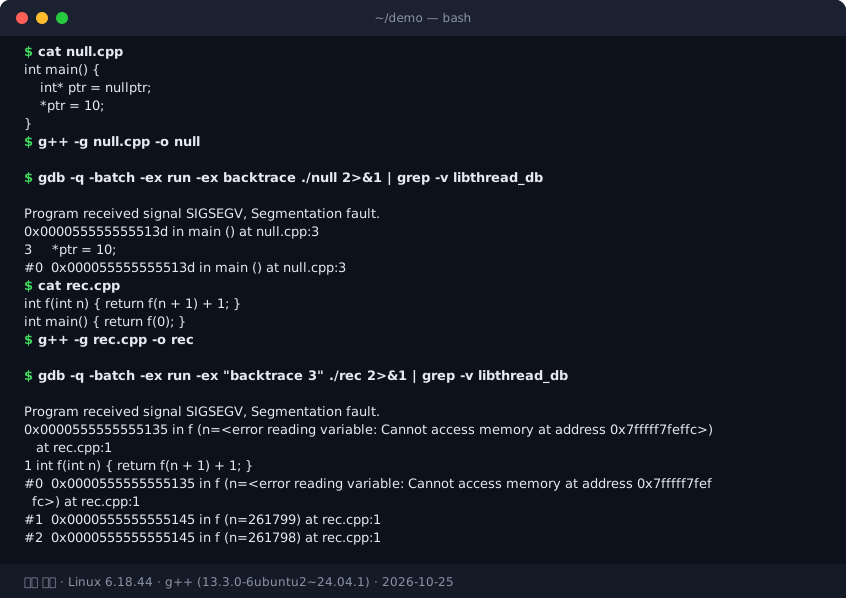
그림: 실제 실행 결과(g++ 13.3, gdb, Ubuntu 24.04) — nullptr 역참조는 크래시한 줄(null.cpp:3)이 바로 나오고, 무한 재귀는 같은 함수가 수십만 단계 쌓인 backtrace가 나온다. 스택 한도에 따라 단계 수는 달라진다. (환경: Linux 6.18.44 · g++ (13.3.0-6ubuntu2~24.04.1))
배열 범위 초과와 해제 후 사용은 미정의 동작이라 크래시가 난다는 보장이 없다는 점이 가장 무서운 부분입니다. arr[10] = 100은 운영체제가 막는 메모리 영역을 건드릴 때만 segfault가 나고, 대부분은 옆에 있는 다른 지역 변수나 함수의 반환 주소를 조용히 덮어써서 전혀 다른 곳에서 이상한 값이나 크래시로 나타납니다. delete 후의 *ptr = 20도 해제된 메모리가 아직 프로세스에 남아 있으면 “잘 동작하는 것처럼” 보입니다. 그래서 처음 C++을 배울 때는 g++ -g -fsanitize=address,undefined main.cpp로 빌드하는 습관을 들이는 것을 권합니다. AddressSanitizer는 범위 초과나 해제 후 사용이 일어나는 바로 그 줄에서 heap-buffer-overflow, heap-use-after-free 같은 이름과 함께 멈춰 주므로, 원인을 찾는 시간이 크게 줄어듭니다. delete 후 ptr = nullptr을 넣는 습관은 같은 포인터 변수의 재사용은 막지만, 같은 메모리를 가리키던 다른 포인터 변수는 여전히 댕글링이라는 한계가 있습니다.
error: redefinition of ‘class/function’
원인
같은 클래스나 함수를 여러 번 정의했을 때 발생합니다. 주로 헤더 파일을 여러 번 포함할 때 나타납니다.
에러 메시지
error: redefinition of 'class MyClass'
error: redefinition of 'void myFunction()'
실제 출력
같은 헤더 shape.h(class Shape { ... };, 인클루드 가드 없음)를 한 파일에서 두 번 포함했을 때입니다.
# g++
In file included from main.cpp:2:
shape.h:1:7: error: redefinition of 'class Shape'
In file included from main.cpp:1:
shape.h:1:7: note: previous definition of 'class Shape'

# clang++
./shape.h:1:7: error: redefinition of 'Shape'
main.cpp:1:10: note: './shape.h' included multiple times, additional include site here
main.cpp:2:10: note: './shape.h' included multiple times, additional include site here
./shape.h:1:7: note: unguarded header; consider using #ifdef guards or #pragma once
Clang은 원인(가드가 없는 헤더가 여러 번 포함됨)까지 note로 알려 주고, GCC는 이전 정의 위치만 보여 줍니다. GCC 메시지를 봤다면 In file included from 줄을 따라 같은 헤더가 두 번 들어오는 경로를 직접 찾아야 합니다.
흔한 상황
- 헤더 파일에 include guard가 없음
- 헤더에 inline이 아닌 함수 정의를 넣음
해결 방법
// ❌ include guard 없음
// header.h
class MyClass {
    // ...
};
// ✅ include guard 사용
// header.h
#ifndef HEADER_H
#define HEADER_H
class MyClass {
    // ...
};
#endif
// 또는 #pragma once 사용 (더 간단)
// header.h
#pragma once
class MyClass {
    // ...
};
include guard가 막아 주는 것은 한 .cpp 파일 안에서 같은 헤더가 두 번 포함되는 경우뿐입니다. a.h와 b.h가 모두 common.h를 포함하고 main.cpp가 둘 다 포함하면 common.h의 클래스 정의가 두 번 들어가 redefinition 에러가 나는데, 가드가 두 번째 포함을 건너뛰게 해 줍니다. 반면 헤더에 함수 정의를 넣으면 가드가 있어도 문제가 남습니다. main.cpp와 util.cpp가 각각 그 헤더를 포함하면 두 파일에 같은 함수가 하나씩 생기고, 이번에는 컴파일이 아니라 링크 단계에서 multiple definition of 'myFunction()' 에러가 납니다. 아래처럼 정의를 .cpp로 옮기거나 inline을 붙이는 이유가 이것입니다.
함수 정의의 경우
// ❌ 헤더에 함수 정의 (여러 .cpp에서 include 시 중복)
// header.h
void myFunction() {
    // 구현
}
// ✅ 헤더에는 선언만, .cpp에 정의
// header.h
void myFunction();
// impl.cpp
void myFunction() {
    // 구현
}
// 또는 inline 사용
// header.h
inline void myFunction() {
    // 구현
}
error: no matching function for call
원인
호출한 인자 타입이나 개수에 맞는 함수를 후보 중에서 하나도 찾지 못했을 때 발생합니다. 오버로드된 함수, 생성자, 템플릿처럼 후보가 여럿일 수 있는 호출에서 주로 이 형태로 나오고, 오버로드가 없는 일반 함수 하나에 맞지 않는 인자를 넘기면 GCC는 대신 cannot convert 'std::string' to 'double'처럼 변환 실패를 바로 알려 줍니다.
에러 메시지
error: no matching function for call to 'process(std::string&)'
note: candidate: 'void process(double)'
note:   no known conversion for argument 1 from 'std::string' to 'double'
note: candidate: 'void process(int)'
note:   no known conversion for argument 1 from 'std::string' to 'int'
실제 출력
void greet(const std::string&, int);를 greet("Kim");처럼 인자 하나로 호출했을 때입니다.
# g++
main.cpp:4:10: error: too few arguments to function 'void greet(const std::string&, int)'
main.cpp:2:6: note: declared here

# clang++
main.cpp:4:5: error: no matching function for call to 'greet'
main.cpp:2:6: note: candidate function not viable: requires 2 arguments, but 1 was provided
후보 함수가 하나뿐이고 인자 개수만 다르면 GCC는 too few arguments라는 더 구체적인 메시지를 내고, 글의 제목인 no matching function for call to는 Clang에서 나왔습니다. 두 표현 모두 “호출과 선언이 맞지 않는다”는 같은 뜻으로 읽으면 됩니다. 오버로드가 여러 개인 경우의 GCC 메시지는 이번에 확인하지 않았습니다.
흔한 상황
- 인자 타입 불일치
- 인자 개수 불일치
- const 불일치
해결 방법
#include <string>

// ❌ 인자 타입 불일치
void process(double value) { /* ... */ }
void process(int value) { /* ... */ }
int main() {
    std::string str = "hello";
    process(str);  // error: no matching function for call to 'process(std::string&)'
}
// ✅ 타입 맞춤
void process(const std::string& value) {
    // ...
}
int main() {
    std::string str = "hello";
    process(str);  // OK
}
// ❌ const 불일치
void print(std::string& str) {
    // ...
}
int main() {
    const std::string str = "hello";
    print(str);  // error: binding reference of type 'std::string&' to 'const std::string' discards qualifiers
}
// ✅ const 추가
void print(const std::string& str) {
    // ...
}
이 에러를 읽을 때는 첫 줄보다 note: candidate: 줄들이 중요합니다. 컴파일러가 후보 함수를 모두 나열하고, 각 후보 아래에 no known conversion for argument 1 from 'std::string' to 'double'처럼 왜 탈락했는지를 적어 주기 때문입니다. const 불일치는 위처럼 discards qualifiers로 나오거나, cannot bind non-const lvalue reference of type 'std::string&' to an rvalue of type 'std::string' 같은 메시지로 나타나기도 하는데, print("hello")처럼 문자열 리터럴(임시 std::string)을 std::string&에 넘길 때 특히 자주 봅니다. 값을 수정하지 않는 매개변수는 처음부터 const std::string&로 받는 습관이 이 에러의 대부분을 없애 줍니다.
error: ‘identifier’ was not declared in this scope
원인
변수나 함수를 선언하지 않고 사용했을 때 발생합니다.
에러 메시지
error: 'myVariable' was not declared in this scope
error: 'myFunction' was not declared in this scope
실제 출력
int count = 0;이 있는데 conut로 잘못 쓰고, std:: 없이 cout을 쓴 경우입니다.
# g++
main.cpp:4:18: error: 'cout' was not declared in this scope; did you mean 'std::cout'?
main.cpp:5:18: error: 'conut' was not declared in this scope; did you mean 'count'?

# clang++
main.cpp:4:18: error: use of undeclared identifier 'cout'; did you mean 'count'?
main.cpp:5:18: error: use of undeclared identifier 'conut'; did you mean 'count'?
두 컴파일러 모두 비슷한 이름을 제안하지만 기준이 다릅니다. GCC는 cout에 std::cout을 제안했고, Clang은 같은 범위에서 가장 가까운 이름인 count를 제안했습니다. 제안은 힌트일 뿐이므로 의도에 맞는지 직접 확인해야 합니다. 메시지 문구도 was not declared in this scope(GCC)와 use of undeclared identifier(Clang)로 다릅니다.
흔한 상황
- 필요한 헤더를 include하지 않음
- 네임스페이스(
std::)를 붙이지 않음 - 변수를 선언하기 전에 사용
해결 방법
// ❌ 헤더 include 안 함
int main() {
    std::cout << "Hello\n";  // error: 'cout' is not a member of 'std'
}
// ✅ 헤더 include
#include <iostream>
int main() {
    std::cout << "Hello\n";  // OK
}
// ❌ 네임스페이스 지정 안 함
#include <vector>
int main() {
    vector<int> vec;  // error: 'vector' was not declared!
}
// ✅ std:: 추가 또는 using namespace
#include <vector>
int main() {
    std::vector<int> vec;  // OK
}
// ❌ 변수 선언 전에 사용
int main() {
    x = 10;  // error: 'x' was not declared!
    int x;
}
// ✅ 선언 후 사용
int main() {
    int x;
    x = 10;  // OK
}
warning: implicit conversion loses integer precision
원인
타입 변환 시 데이터 손실 가능성이 있을 때 경고가 발생합니다.
에러 메시지
warning: implicit conversion loses integer precision: 'long' to 'int'실제 출력
long big = 3000000000L; int small = big;를 -Wall -Wextra -Wconversion으로 컴파일했을 때입니다.
# g++
main.cpp:3:17: warning: conversion from 'long int' to 'int' may change value [-Wconversion]

# clang++
main.cpp:3:17: warning: implicit conversion loses integer precision: 'long' to 'int' [-Wshorten-64-to-32]
글의 제목인 implicit conversion loses integer precision은 Clang의 문구입니다. GCC는 같은 상황을 conversion from 'long int' to 'int' may change value로 보고하고, -Wconversion을 켜야 나옵니다. 경고 옵션 이름도 -Wconversion(GCC)과 -Wshorten-64-to-32(Clang)로 다릅니다.
흔한 상황
- 큰 타입에서 작은 타입으로 변환
size_t에서int로 변환
이 메시지는 Clang의 -Wshorten-64-to-32(-Wconversion에 포함되며 Xcode 프로젝트 기본 설정에서 켜져 있음) 경고 형식입니다. GCC는 기본 설정에서는 이 변환에 경고를 내지 않고, -Wconversion을 켜야 conversion from 'long int' to 'int' may change value처럼 표시합니다. 같은 코드가 한 환경에서는 조용하고 다른 환경에서는 경고투성이인 이유가 이것입니다. 경고를 없애려고 static_cast를 붙이는 것은 “값이 잘릴 수 있다는 걸 알고 있다”는 표시일 뿐 잘림을 막아 주지는 않으므로, 실제로 값이 int 범위를 넘을 수 있다면 타입을 넓히는 것이 올바른 해결입니다. 참고로 64비트 Windows(MSVC)에서는 long이 32비트라 long에서 int로의 변환은 손실이 없지만, size_t는 64비트라 같은 경고가 납니다.
해결 방법
// ❌ 암시적 변환 (경고 발생)
long bigNumber = 1000000000L;
int smallNumber = bigNumber;  // warning!
// ✅ 명시적 캐스팅
long bigNumber = 1000000000L;
int smallNumber = static_cast<int>(bigNumber);
// ❌ size_t → int 변환
std::vector<int> vec = {1, 2, 3};
int size = vec.size();  // warning!
// ✅ size_t 사용 또는 명시적 캐스팅
std::vector<int> vec = {1, 2, 3};
size_t size = vec.size();  // OK
// 또는
int size = static_cast<int>(vec.size());
error: use of deleted function
원인
복사 생성자나 대입 연산자가 삭제된 객체를 복사하려 할 때 발생합니다.
에러 메시지
error: use of deleted function 'MyClass::MyClass(const MyClass&)'실제 출력
std::unique_ptr<int> b = a;처럼 복사를 시도했을 때입니다.
# g++
main.cpp:4:30: error: use of deleted function 'std::unique_ptr<_Tp, _Dp>::unique_ptr(const std::unique_ptr<_Tp, _Dp>&) [with _Tp = int; ...]'
/usr/include/c++/13/bits/unique_ptr.h:522:7: note: declared here
  522 |       unique_ptr(const unique_ptr&) = delete;

# clang++
main.cpp:4:26: error: call to deleted constructor of 'std::unique_ptr<int>'
.../bits/unique_ptr.h:522:7: note: 'unique_ptr' has been explicitly marked deleted here
두 컴파일러가 가리키는 위치는 표준 라이브러리 헤더의 unique_ptr(const unique_ptr&) = delete; 한 줄로 같습니다. 오류 줄은 std::unique_ptr<_Tp, _Dp> 같은 템플릿 이름이 길게 펼쳐지므로, use of deleted function 뒤의 함수 이름에서 (const ...&) 복사 생성자임을 읽는 것이 핵심입니다.
흔한 상황
unique_ptr복사- 복사 생성자가
= delete인 클래스를 복사
해결 방법
// ❌ unique_ptr 복사
std::unique_ptr<int> ptr1 = std::make_unique<int>(10);
std::unique_ptr<int> ptr2 = ptr1;  // error: use of deleted function!
// ✅ move 사용
std::unique_ptr<int> ptr1 = std::make_unique<int>(10);
std::unique_ptr<int> ptr2 = std::move(ptr1);  // OK
// ❌ 복사 생성자 삭제된 클래스
class NonCopyable {
public:
    NonCopyable() = default;
    NonCopyable(const NonCopyable&) = delete;
};
NonCopyable obj1;
NonCopyable obj2 = obj1;  // error: use of deleted function!
// ✅ 참조 사용 또는 포인터 사용
NonCopyable obj1;
NonCopyable& obj2 = obj1;  // OK (참조)
이 에러는 코드에 delete를 쓴 적이 없어도 나옵니다. 클래스에 std::unique_ptr나 std::mutex 같은 복사할 수 없는 멤버가 하나라도 있으면 컴파일러가 만든 복사 생성자가 자동으로 삭제되고, 그 클래스를 std::vector에 push_back하거나 값으로 넘기는 순간 use of deleted function 'MyClass::MyClass(const MyClass&)'와 함께 note: 'MyClass::MyClass(const MyClass&)' is implicitly deleted because the default definition would be ill-formed라는 설명이 붙습니다. 이 note 아래를 따라가면 어느 멤버 때문에 삭제되었는지 알려 주므로, 에러의 첫 줄만 보지 말고 note를 끝까지 읽는 것이 해결의 지름길입니다.
error: expected ’;’ before ’}‘
원인
세미콜론 누락 같은 문법 오류가 있을 때 발생합니다. 정확한 문구는 무엇을 기대했는지와 다음에 무엇이 왔는지에 따라 달라집니다.
에러 메시지
error: expected ';' before '}' token
error: expected ';' after class definition
error: expected ',' or ';' before 'int'
실제 출력
struct Point { int x; int y; } 뒤에 세미콜론을 빠뜨린 경우입니다.
# g++
main.cpp:4:2: error: expected ';' after struct definition
    4 | }
      |  ^
      |  ;

# clang++
main.cpp:4:2: error: expected ';' after struct
이 경우 GCC 13은 글 제목의 before '}'가 아니라 after struct definition이라고 말하고, 빠진 위치에 ;를 넣어야 한다는 수정 제안까지 보여 줍니다. 오류가 가리키는 줄은 구조체가 끝나는 }가 있는 4번째 줄이고, 다음 줄의 int main()이 문제인 것이 아닙니다.
흔한 상황
- 클래스 정의 끝에 세미콜론 누락
- 문장 끝에 세미콜론 누락
해결 방법
// ❌ 클래스 정의 끝에 세미콜론 누락
class MyClass {
    int value;
}  // error: expected ';' after class definition
// ✅ 세미콜론 추가
class MyClass {
    int value;
};  // OK
// ❌ 변수 선언 끝에 세미콜론 누락
int main() {
    int x = 10
    int y = 20;  // error: expected ',' or ';' before 'int' (가리키는 위치는 이 줄)
}
// ✅ 세미콜론 추가
int main() {
    int x = 10;
    int y = 20;  // OK
}
세미콜론 누락은 컴파일러가 다음 토큰을 읽고 나서야 문법이 깨졌다는 것을 알기 때문에, 에러가 가리키는 줄이 실제로 고칠 줄의 바로 아래인 경우가 많습니다. 특히 클래스 정의 끝의 ;를 빠뜨리면 그 헤더를 포함한 .cpp 파일의 첫 줄에서 expected ';' after class definition이나 multiple types in one declaration, 심하면 표준 헤더 안에서 수십 개의 에러가 쏟아져 헤더가 고장 난 것처럼 보입니다. 에러가 엉뚱한 파일을 가리킨다면 그 직전에 포함된 내 헤더의 마지막 줄부터 확인하세요.
error: invalid use of incomplete type
원인
전방 선언만 보이고 정의는 보이지 않는 클래스의 크기나 멤버가 필요한 코드를 썼을 때 발생합니다. 객체를 만들려고 하면 GCC는 aggregate ... has incomplete type 형태로, 포인터를 통해 멤버를 쓰려고 하면 invalid use of incomplete type 형태로 알려 줍니다.
에러 메시지
error: invalid use of incomplete type 'class MyClass'
error: aggregate 'MyClass obj' has incomplete type and cannot be defined
실제 출력
class Engine;로 전방 선언만 한 채 두 가지 방식으로 쓴 경우입니다.
# 멤버 변수로 사용: class Car { Engine e; };
g++:     main.cpp:3:12: error: field 'e' has incomplete type 'Engine'
clang++: main.cpp:3:12: error: field has incomplete type 'Engine'

# 멤버 접근: e->start();
g++:     main.cpp:3:6: error: invalid use of incomplete type 'class Engine'
clang++: main.cpp:3:6: error: member access into incomplete type 'Engine'
글 제목의 invalid use of incomplete type은 GCC가 전방 선언된 타입의 멤버를 쓸 때 내는 메시지입니다. 멤버 변수로 두는 경우에는 field ... has incomplete type으로 문구가 바뀌고, 두 경우 모두 note: forward declaration of 'class Engine'으로 전방 선언 위치를 알려 줍니다. 해결은 사용하는 파일에서 Engine의 전체 정의(#include "engine.h")를 보이게 하거나, 멤버를 포인터·참조로 바꾸는 것입니다.
흔한 상황
- 전방 선언만 하고 클래스 정의가 있는 헤더를 include하지 않음
- 두 헤더가 서로를 include하는 순환 의존성
해결 방법
// ❌ 전방 선언만 하고 사용
class MyClass;  // 전방 선언
void use(MyClass* p) {
    p->doSomething();  // error: invalid use of incomplete type 'class MyClass'
}
int main() {
    MyClass obj;  // error: aggregate 'MyClass obj' has incomplete type
}
// ✅ 헤더 include
#include "MyClass.h"
void use(MyClass* p) {
    p->doSomething();  // OK
}
int main() {
    MyClass obj;  // OK
}
// 순환 의존성 해결
// A.h
#pragma once
class B;  // 전방 선언
class A {
    B* b;  // 포인터는 OK
};
// B.h
#pragma once
class A;  // 전방 선언
class B {
    A* a;  // 포인터는 OK
};
전방 선언만으로 할 수 있는 일과 없는 일을 구분하면 이 에러를 예측할 수 있습니다. 컴파일러가 크기나 멤버를 알아야 하는 작업(객체 생성, 멤버 함수 호출, 값으로 멤버에 두기, sizeof, 상속)에는 완전한 정의가 필요하고, 포인터나 참조를 선언하는 것은 크기가 정해져 있으므로 전방 선언으로 충분합니다. 그래서 헤더에서는 전방 선언과 포인터를 쓰고, 실제로 멤버를 호출하는 .cpp에서만 헤더를 include하는 방식이 순환 의존성을 끊는 기본 패턴입니다. PIMPL 관용구에서 std::unique_ptr<Impl>을 쓸 때도 같은 규칙이 적용되어, 소멸자를 헤더에서 암시적으로 만들게 두면 invalid application of 'sizeof' to incomplete type 'Impl' 에러가 납니다. 이때는 헤더에 ~Widget();을 선언하고 Impl이 정의된 .cpp에서 Widget::~Widget() = default;로 정의해야 합니다.
error: no member named ‘X’ in ‘Y’
원인
존재하지 않는 멤버 변수나 멤버 함수에 접근하려 할 때 발생합니다.
에러 메시지
error: no member named 'getValue' in 'MyClass'실제 출력
struct Foo { int value; };에 f.valeu = 3;처럼 철자를 틀렸을 때입니다.
# g++
main.cpp:6:7: error: 'struct Foo' has no member named 'valeu'; did you mean 'value'?

# clang++
main.cpp:6:7: error: no member named 'valeu' in 'Foo'
글 제목의 no member named 'X' in 'Y'는 Clang의 문구이고, GCC는 'struct Foo' has no member named 'valeu'라고 쓰면서 이 경우에는 did you mean 'value'?로 올바른 이름까지 제안했습니다. 이 테스트에서 Clang 18은 제안을 붙이지 않았습니다.
흔한 상황
- 이름 오타
- private 멤버에 접근(별도 메시지로 나옴)
- 기반 클래스에 없는 멤버에 접근
해결 방법
// ❌ 오타
class MyClass {
public:
    int getValue() const { return value; }
private:
    int value;
};
int main() {
    MyClass obj;
    obj.getvalue();  // error: 'class MyClass' has no member named 'getvalue'; did you mean 'getValue'?
}
// ✅ 올바른 이름
int main() {
    MyClass obj;
    obj.getValue();  // OK
}
// ❌ private 멤버 접근
class MyClass {
private:
    int value;
};
int main() {
    MyClass obj;
    obj.value = 10;  // error: 'int MyClass::value' is private within this context
}
// ✅ public getter/setter 사용
class MyClass {
public:
    void setValue(int v) { value = v; }
    int getValue() const { return value; }
private:
    int value;
};
int main() {
    MyClass obj;
    obj.setValue(10);  // OK
}
제목의 no member named 'X' in 'Y'는 Clang의 메시지이고, GCC는 같은 상황에서 'class MyClass' has no member named 'getvalue'; did you mean 'getValue'?처럼 비슷한 이름을 제안해 줍니다. 오타라면 이 제안이 거의 정답입니다. private 멤버 접근은 “멤버가 없다”가 아니라 is private within this context라는 별도 메시지로 나오므로, 두 경우를 구분해 읽으면 원인을 바로 알 수 있습니다. 템플릿 안에서 기반 클래스의 멤버를 쓸 때 this->를 빠뜨려 there are no arguments to 'foo' that depend on a template parameter 같은 에러가 나는 것도 비슷한 증상의 흔한 변형입니다.
에러 메시지 읽는 법
컴파일러 에러 메시지는 길지만 구조는 일정합니다.
에러 메시지 구조
파일명:줄번호:열번호: error: 메시지예시
main.cpp:10:5: error: 'x' was not declared in this scope
     x = 10;
^main.cpp:10:5는 main.cpp의 10번째 줄 5번째 열을 뜻하고, 그 뒤의 'x' was not declared in this scope가 문제의 내용이며, 아래 두 줄은 해당 코드와 위치 표시입니다. 이 예시라면 10번째 줄에서 선언하지 않은 x를 사용했다는 뜻입니다. 헤더나 템플릿 안에서 난 에러는 In file included from ...이나 required from here 같은 줄이 앞뒤로 붙는데, 이 줄들을 따라가면 내 코드의 어느 줄이 원인인지 찾을 수 있습니다.
에러가 여러 개 쏟아질 때는 첫 번째 에러부터 고칩니다. 앞의 문법 오류 하나 때문에 컴파일러가 이후 코드를 잘못 해석해 생긴 연쇄 에러가 많아서, 첫 에러를 고치면 나머지가 함께 사라지는 경우가 흔합니다.
경고를 켜고 빌드하기
g++ -Wall -Wextra -g main.cpp -o program-Wall과 -Wextra는 초기화하지 않은 변수 사용, 부호 있는/없는 정수 비교, 반환값 없는 함수처럼 컴파일은 되지만 버그일 가능성이 높은 코드를 알려 줍니다. 이름과 달리 -Wall이 모든 경고를 켜지는 않으므로 -Wextra를 함께 쓰는 편이 좋습니다. -Werror를 더하면 경고도 에러로 처리되어 경고를 무시하고 넘어갈 수 없게 됩니다. -g는 디버그 정보를 넣어 gdb와 AddressSanitizer가 소스 줄 번호를 보여 줄 수 있게 합니다.
원인을 찾기 어려운 에러는 문제를 재현하는 최소한의 코드로 줄여 보는 것이 가장 확실합니다. 관련 없는 코드를 지우거나 주석 처리하면서 에러가 사라지는 지점을 찾으면, 대부분 그 과정에서 원인이 드러납니다.